


Hey guys sorry I haven't been posting recently, school has really kept me busy. I hope I can start pumping out more tutorials for both Photoshop and Gimp, but for now I will just show you some of the things I've been doing.
Ok this one was a guitar (obviously) done from scratch in a vector style. Done in Photoshop, about one and a half hours to complete. I used mainly the pen tool. I suggest for projects like these to have a model definitely.
This one is my latest photo-manipulation. Made in Photoshop in about 45 minutes. Besides removing the head and replacing what was missing of the shirt, I also messed with colors and lighting.
Not the most original idea, I've seen similar pieces to this done around before, just thought I'd have my own try at it.
Did this a while ago, the texture on the skin is... Could you guess? It was the stump of a tree.
A style obviously inspired by the one and only Abduzeedo: 
Aside from these, I've made more Youtube videos for Gimp users, and also a little demo on the capabilities of the Clone tool in either program.
[high quality]
Check out the rest of my Gimp vids on YouTube here
Subscribe To
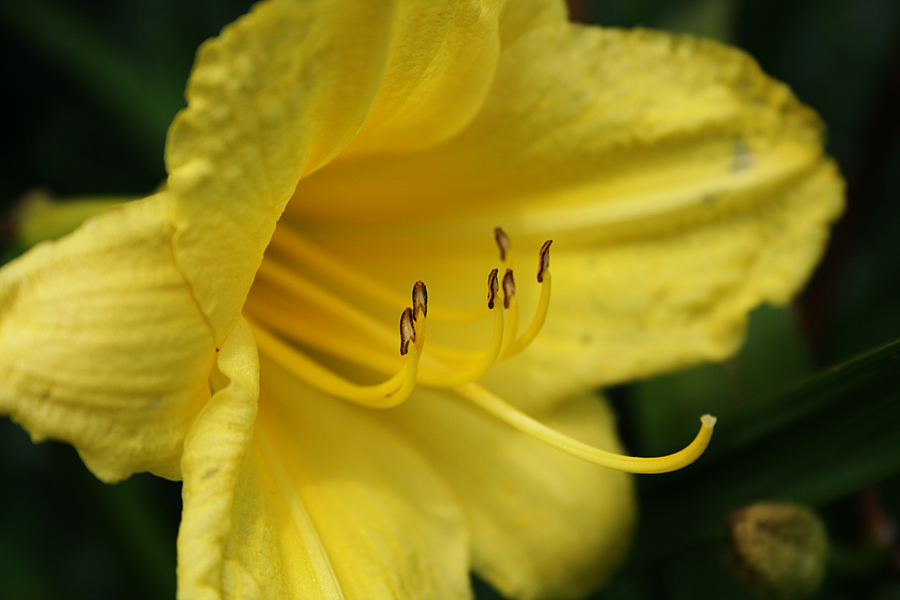
Today I am going to show you how to create this image:

1. Open up the flower image provided here. Duplicate the image and go to Hue/Saturation and change the hue to +10. Change this layer's mode to "Color". Lower the opacity to 50%.

2. Paste in your dollar bill image. Rotate it to be going vertical if needed. Don't bother resizing the original dollar layer, instead just duplicate the layer and scale the duplicate layer to a realistic size. Place it under one of the arms of the flower.

3. Open up an image of an apple's stem. Render out just the stem and place it right above the dollar. Merge the stem layer onto the dollar layer. Duplicate this layer and hide one of them. Go to Edit>Transform>Warp and manipulate the dollar to make it look unique and natural.

4. Reveal the duplicated stem-dollar layer and duplicate it several more times and move those duplicates to other locations on the flower. Go to Edit>Transform>Warp for each bill to give them a unique look. Scale them to realistic sizes. Blur the dollar bills that are further away. Use the Dodge/Burn Tool to add some dynamic lighting and shading onto the dollar bills.

5. Select each of the dollar bills by either going to Select>Load Selection>Add to Selection on each layer or holding Ctrl and Shift while clicking on each layer's icon on the layer's dialog. Create a new layer and fill the selection with color #a28a00. Change the layer mode to "Soft Light" and lower the opacity to 60%.
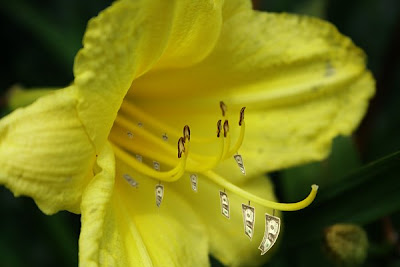
6. Create a new layer and go to Image>Apply Image. Using the Burn Tool, darken the center area of the flower with a very large soft brush. You may need to select everything but the part of the flower that is on the left that should stay light

7. Now for some gradient maps. Create a new layer and go to Image>Apply Image. Now go to Image>Adjustments>Gradient Map and change the map to the already made Purple-Orange gradient. Change the layer mode to "Soft Light" at 25%. Repeat this process except this time use a light blue as the foreground of the gradient and a dark blue for the background. Change the layer mode to "Saturation" at 35%.

You're now finished, congratulations :)
So recently activity here has picked up considerably. I'm glad that nothing's died down and that I've still been keeping active myself.
Here are some stats from the past month the site has been running: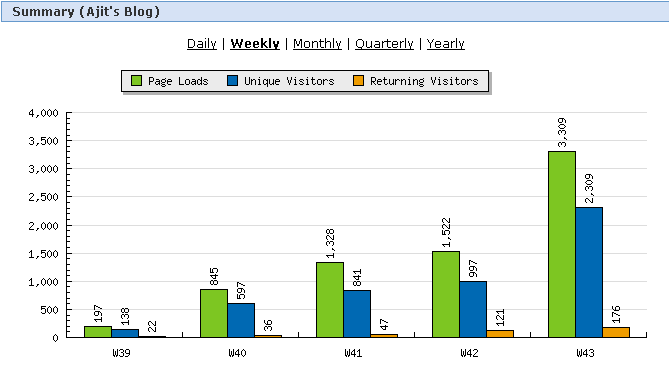
Thanks Statcounter.com :)
Several things have helped the site along the way including having three of my tutorials being featured at Noupe.com. Check it out here
As well as having my Sin City tutorial being featured on Gimp-tutorials.net
____________
So basically I just wanted to say thanks for coming to the site, it really encourages me to do more :)